Showing posts with label invitations and cards. Show all posts

Friday, February 13, 2015

Fair Trade Valentine's Cards - Free Download!


Happy Valentine's Day! I figured I better break my month long silence and share something....

This card I drew for Fair Trade Campaigns last year is available as a free download on their website here. It was created for customers to send to their favorite fair trade farmers & artisans.

Just for fun, here are 2 alternate versions that I loved, but sadly didn't get picked : ( I had an elaborate plan of making a different background for each of the fair trade industry they were trying to highlight: roses, coffee, chocolate, plus a "generic" square version that could be used for other products, but they wanted to go with something simpler. The coffee & generic versions are shown below.


Do you have a favorite fair trade product? Mine is definitely CHOCOLATE - I have to have a bar at my desk at all times - it helps me work!


Wednesday, October 1, 2014

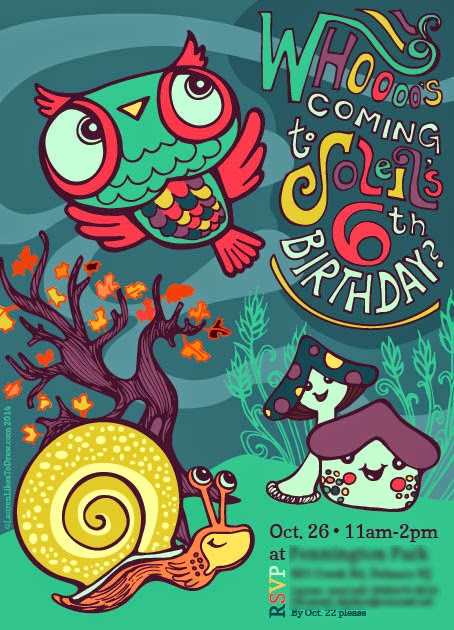
Fall Owl Birthday Invitation


After my social media class last month, I've been *trying* to post more regularly on this blog, so I'm going to share this invitation I recently made. I'm breaking my former rule of only sharing work after the event has passed, and in this case, before some of the invites were even mailed ;)

I usually make a Halloween themed invite for her birthday every year, but this time decided to go with some fall woodland creatures. She is obsessed with snails, so I had to include one. The mushrooms & owl were my personal choosing, but I did ask what color she wanted them to be and she said "Rainbow!".

So here is my attempt at a "rainbow" fall color scheme. I think it came out OK, but has some room for improvement, so I will be re-coloring with 2 different schemes in the next couple weeks.

As I was inking the owl, I had a major case of dejavue, "I feel like I've drawn this owl before.....". Because as it turns out, I have, more than once. So much so, I've made a blog label for them.

Sunday, July 20, 2014

Rustic Wedding Save the Date Postcard


It seems like EVERYONE I know is getting married this year - I've been to 5 weddings already in 2014. Please slow down friends, or I will be completely out of money ;). But on a positive note, it also means I've been working on several wedding related projects and they are so much fun. I really love the "Rustic" wedding look that's popular right now.

This save the date wedding postcard was made to include the future bride & groom and their four (very loved) pets, two labradoodles and 2 cats.  The bride wanted a simple line drawing in the spirit of Life is Good characters. I drew them a bit more detailed, but still kept it simple and I really like the way it turned out. I just got my printed sample, and was incredibly happy to discover that the colors printed as vibrant as they were on my screen, and the quality was fantastic. I'm thinking of making this a customizable card option (choose how the bride and groom and any pets look) once I get my store section of my new site up, which is still a few months away but in the works!

Friday, January 10, 2014

Hipster Wedding Invitation with Mason Jar!


I shared a sneak peak of the caricature I drew for this wedding invitation on facebook last month, and now that the wedding is passed, I figured I should show the rest of the invite.

I drew this for an old friend who was getting married quickly, but had very specific goals for her invitation: unique, retro, & printed on recycled paper


While it would have been easy to make a flat 5x7 card and call it a day, this was their wedding, afterall, and I wanted to make something a little more special. I settled pretty early on a caricature of the couple, and thought it would be cool to have a little die-cut action, but didn't want to get too crazy, as I would be cutting them by hand. So I compromised with a modified circle shape which would fit the hands on the front side, and their heads on the reverse. The result was a card that opened horizontally, but still fit into a (recylced) 5x7 envelope - I was really happy with the way it turned out!


Wednesday, November 27, 2013

Birthday Thank You Card

 
Just wanted to share a quick thank you card I made for my daughter's birthday last month.  I chose a photo of her to be the main focus of the card, but I wanted to add a bit of decoration to make it a little more fun :) 


I was lucky to have a great photo to start with, though I did change the wall in background from tan to grey so it would be more neutral and not clash with the rest of the bright colors in the card. I found a few whimsical fonts, but it still was looking a little plain, so I used my Wacom tablet to draw some doodles around the words - use could also draw with your mouse or download some free sketchy doodles like these. I was very happy with the end result and how quickly I was able to pull it together - I was able to complete the whole project in a little more than an hour....now actually addressing and filling the cards out is a different story - those things sat on my desk for more than a week ;)

Fonts used: Quentin Caps

Thursday, August 15, 2013

Graduation Postcard

 Once again I've taken an extended vacation from blogging (but it is summer, afterall ;), so I'll be playing catch-up these next few weeks while I update with some recent projects.

This is a two sided postcard I designed for Continental Studios, which was sent out to all their high school & college customers to remind them to buy their senior portraits.
I really love the yellow-gray color combo that's popular right now, and it works perfect as a gender-neutral scheme for this card.


Wednesday, July 18, 2012

TUTORIAL: Make Your Own Invites with Photoshop Elements

 By popular request, this is a tutorial on how to make your own flat invitations using Photoshop Elements (but it's also pretty much the same in regular Photoshop as well). 

Photoshop Elements Giveaway: One person who leaves a comment on this post, will win their own copy of Photoshop Elements 9 for MAC or PC!  Elements is a great program for anyone who wants to edit photos or do simple graphic design without getting overwhelmed by the feature overload of regular Photoshop. Scroll down to the bottom of this post for contest details.

You can download a free 30 day trial of Photoshop or Photoshop Elements on the Adobe website here.


STEP 1 - DOWNLOAD ILLUSTRATIONS & FONT FILES:
As a demo, we're going to create the invitation shown above and you'll need to download a few free graphics and fonts before we begin. Don't worry, they are all free, from sites that I use on a regular basis and can be used for personal or commercial use. Make sure to DOWNLOAD & INSTALL the fonts before moving on to the next step.


STEP 2 - SET UP THE FILE:

(click on screenshot to enlarge)

Open Photoshop Elements Editor and in the top menu, go to FILE -> NEW -> BLANK FILE, then name your document and set the Width to 5 inches, the Height to 7 inches, and the resolution to 300 pixels/inch. You will also want to go to FILE -> SAVE and save your card now and a few times during the design process (I use the MAC keyboard shortcut: Command + S, or PC shortcut: Control + S to save my files quickly while working).


STEP 3 - ADD DESIGN ELEMENTS:

 (click on screenshot to enlarge)

Now we're going to add the background pattern. In the top menu, go to FILE -> OPEN and go to the location of the Simple Blue Raindrop Pattern.


(click on screenshot to enlarge) 


You can see that it opens in a different window, but we need to get it on our card. In the top menu, go to SELECT -> ALL. If you want to be faster, you can also use the keyboard shortcut: command +A (on PC) or control + A (on PC). 


Now go to EDIT -> Copy (Or use the snazzy keyboard shortcut: command + C (on MAC) or control + C (on PC)


Go back to your card file and "paste" the pattern, either by going to EDIT -> PASTE in the top menu, or using keyboard shortcut: command + V (on MAC) or control + V (on PC).


Now we want the pattern to fill the entire background which can be done 2 ways: Either continue to PASTE the pattern 5 more times and manually move them together, OR use the duplicate keyboard shortcut (MAC: hold down OPTION & Mouse Click, then hold SHIFT and drag the pattern to the right, PC: ALT + Mouse Click, then hold SHIFT and drag the pattern to the right). When you hold down the shift key and move an object, your object will only move in a straight line (very helpful!)


You want your pattern to be nice and even with no seams - zoom in to make sure 

OPTIONAL: To keep things tidy, I also like to flatten all the pattern layers together by using the keyboard shortcut MAC: COMMAND + SHIFT + E  or PC: ALT + SHIFT + E


Now we are going to add a white box for the text. Go to the left side menu and choose a color (circled), make sure you've selected white.


Now click on the CUSTOM SHAPE TOOL (circled) and choose a rectangle


Click and drag on top of your raindrop pattern to make your box. You can adjust the size by using the scaling boxes on all four corners and move your box to center it. 

OPTIONAL: I faded the white box a little bit so you can see a light pattern showing through. If you like this effect, go over to the layer palette on the bottom right hand side, make sure you're on the shape1 layer and change the opacity (circled) to 75%.


I want to add the cupcake illustration now, so in the top menu, go FILE -> OPEN and locate the cupcake you downloaded. 


It's going to open up in another window again, so you'll have to repeat the sample steps you did with the raindrop pattern to paste it on your card file (In the top menu, go to SELECT -> ALL;  EDIT -> COPY; then click back over to your card file and go to EDIT -> PASTE).


 It's pasted but we need to scale it down to fit in the right corner. 


You'll see the transform tool right below the top menu. Make sure the "Constrain Proportions" box (circled) is checked then scale the cupcakes using the scale boxes in the any of the four corner of the bounding box.


Move the cupcakes to the bottom right.


STEP 3 - ADDING TEXT:

On the left hand menu, click on the Type Tool. 


Just below the top menu, you'll see the type options box appear. Choose "Jenna Sue" as your font (circled) and fuchsia as your color (circled)
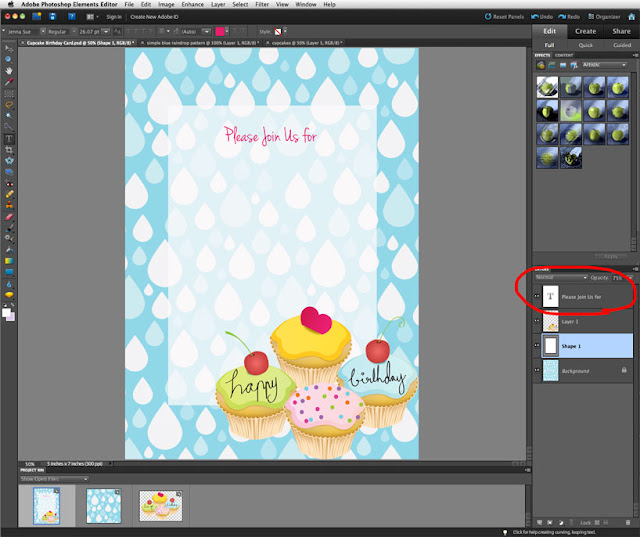


Click where you want to start typing.  If your type is faded or invisible, then it's under other layers. Make sure the type layer is on top in the layers palette (circled). Drag it to the top of the layers palette if necessary.


Fill in the rest of the type, using the font Maiden Orange and changing the colors as needed. I made each line of type in it's own text box, so I can control the line spacing, rather than having it as one single paragraph. There's much better type spacing tools in Photoshop, so you wouldn't need to have each line of type in it's own box. 

Make sure you save your file. The default file is a .psd, which will open in either Photoshop or Photoshop Elements for editing. You may also want to save a high quality JPEG version (this is printable on any one's computer, whether or not they have Photoshop) and a Web version (for emailing and other online use) Both these options are found in the top menu, under FILE

DONE!

Photoshop Elements Giveaway: Just leave a comment on this post letting me know what you would use Photoshop Elements for. The giveaway ends on Friday July 27, at 11:59 EST, and I will pick a winner using the number generator at random.org Please make sure your comment includes an email address or some way to contact you! GOOD LUCK!

UPDATE: The winner of Photoshop Elements is comment #4, mamaco! Can you please email me at laurendraws(at)gmail(dot)(com), and let me know where you want me to send your prize?

Tuesday, February 14, 2012

Make your Own Invites: What you need to know BEFORE you Start

 Up until this point, this blog has been mostly me posting my work, with not too much talking. But I realize that this has a limited reach as far as helping people. So I have decided to start a (hopefully weekly) feature on my blog; DESiGN for the Common Man, in which I share simple design tips and tutorials, because I know so many crafty people that want to design something themselves, but don't quite know where to start.

So what's the #1 design request I get from my friends? (Jenner this is for you!)

Can you design a really cool invitation for my party/wedding?

Yes, I could, but so can you! But first, I want to ask you, are you designing this yourself only to save money? Because depending on how many cards you need and how much printer ink/paper/envelopes you are going to use, it might not be as cheap as you thought. There are so many online photo and card companies with reasonably priced cards (my personal favorite is tinyprints - they sell specialty cards designed by industry-leading designers & illustrators). Another budget-friendly option is searching etsy for "printable invitation".  Most 5x7 cards sell for around $10- $15 and will be designed to fit your needs, then you can get some nice paper & envelopes and print yourself, or use a print-on-demand service like Staples or Kinkos. 

But if you still really really really want to design it yourself, here's how:


TUTORIAL: HOW TO make a 5x7 flat Invitation - Some helpful tips to know before you start

1) GET A DESIGN PROGRAM:  

I use Photoshop CS5, which is pricey to buy, but you can download a free 30 day trial on their website here. You might also want to check out the much cheaper Photoshop Elements (which may have come free with your printer purchase, or download a 30 day trial here), Microsoft Publisher, or a free design program like Gimp.

1) GET SOME ART:
  
JUST A NOTE: You are mostly likely making this for personal use, but I'm going to mention this anyway - some, but not all of the art on the sites I list below are for personal use only, if you are going to be making money from your design, you will may need to buy a commercial license, read the fine print to be sure.

There is a ton of FREE and almost free vector patterns and illustrations available on the internet. Some great sites to search are Vecteezy.com, lovevectorfree.com, and 123freevectors.com. You may be able to find something you like there.  This is a card I made for a coworker using a free background pattern from Vecteezy.

If you don't mind spending a few dollars, you can search through the very affordable and expansive selection of stock illustrations & patterns on a site like istock or shutterstock. Below is an example of a card I made using an illustration of a woman I purchased off istock for $2! 


Almost all of the illustrations, patterns, and photos can be purchased off istock for less than $20, and can be used commercially (check licensing agreements for exact specs). 

Another budget option, Etsy! Search for "digital clip art" or "digital paper pack"to get lots of cute art options. Most can be bought for around $5. One downside of buying from etsy is you may have to wait up to 24-48 hours to receive your purchase (based on the seller), while getting art from Vecteezy or istock is an instant download. Also, as my company recently found out, there is no guarantee that the seller actually owns any copyrights to the image, they could be selling a close copy of art owned by someone else - so I would strongly suggest buying your art elsewhere if you are going to be using it commercially.

3) GET SOME FONTS:

I love love love fonts, and here's my secret: I get *most* for free through Font Squirrel. These are all high-quality, free, commercial use fonts, but the selection is much more sophisticated and smaller than my second favorite site, Dafont. Not all of Dafonts fonts are free for commercial use, so look at the readme.txt before using them for this purpose. Download a few that you like, some may work better than others for your design, but you won't know until you try. 

And if you have high taste and some money to spend, look no further than myFonts, the go-to site of many graphic designers.

Here is an invitation I made using the font Dirty Ego, a free personal and commercial use font from dafont.


Don't know how to install the fonts once you've downloaded them? Check out instructions here:


Okay, I think that is enough information overload for now!


Are you ready to start designing your card? Check out Part 2 of the Tutorial Here!

Saturday, January 21, 2012

Shhhh......the secret to how I draw -REVEALED!!

Now that the holidays are long gone, I wanted to talk about the Christmas Card I made for 2011.


yeah, this one. 

(a HUGE improvement over my cards of Christmas Past, but I'm getting off topic).


More specifically, I want to talk about this guy.

.......and how he was created.

I'm not one of those "I draw everything perfect the first time, no need for revisions" people. I wish! I actually draw the same thing over and over, using tracing paper over my drawings to refine each step. Ah, there you have it, the secret of how I draw has already been revealed, dang, No need to read on.

But anyway, before he was that guy,

he was this, a face in a dust storm of crappity crap crap.


I focused in on this bunch of scribbles, because I thought it had potential.


So I traced over it using my tracing paper and a 2b pencil, added a body and got this:

Slightly better, but still needs work...let's try again.I should also add that I took some reference shots of a model (okay, my mom) wearing a hat and holding a dog leash so I could be sure I got the pose right.


Ohhhhh! I like where this is going, one more time! But this time using black markers...


Sweet, success! 


Okay, now do that 10 other times with various other elements and piece everything together using our friend, Photoshop. Depending on the project, I might also turn the final into a vector drawing, though I didn't for this particular one.


Now, I really need to get started on a new drawing for the landing page of my website, oye!

Tuesday, October 25, 2011

Halloween Party Invite


I couldn't let October end without acknowledging Halloween, my absolute favorite holiday to design products for (and sadly, who's glory is short-lived, to be quickly overshadowed by Christmas). Black, orange, purple, creepy characters, black cats...love it!

This is the invite I made for my daughter's Birthday this month, it's not too scary for a 3 year old's party, right??

 I made the front illustration in Illustrator, but wasn't happy with it, so I decided to try something new, and take the file into Photoshop to add some textures and effects.


here's my illustrator file:

(ahhhh! shield your eyes, it's hideous!)


And here it is, post-photoshop magic:


This is the original inside, scrapped because it was too hard to read and would waste way too much printer ink:


And the final inside:


To save time, I used a free, vector "frame" from Vecteezy for the inside. Sometimes, there is just not enough time to draw each and every element, that's when graphic designer Lauren takes over :) I loved this particular border and you can't argue with free. 


Sunday, August 14, 2011

Baby Shower Invite


Okay, here it is...the previous sneak peak....

....A baby shower invite for my lovely sister (who is due this week with a long-awaited little girl! ah, hurry up, lil' Sara Jr! I want to hold you!!).

I really loved the way this turned out and was so happy to finally show it to her 2 weeks ago (the party was a surprise).

In addition to the card, I also make a matching "shopping list" to include in card and matching candy bars as a shower favor.   

The complete set is shown below (can you tell I love branding?? hehe).


Related Posts Plugin for WordPress, Blogger...