Showing posts with label painting. Show all posts

Tuesday, March 17, 2015

Yoga Studio Mural at Yogawood- the Process from Sketches to Painting


It's been a super busy last 4-5 months for me which has left little time to blog, but that's okay with me. As a full time freelancer, it seems like it's always feast or famine - everyone wants me to work for them at the same time, then I go through periods of little to no work. This summer will mark the beginning of my 3rd year freelancing, and I'm starting to get better at managing my workflow - next time I have a lull in work, I have quite a few personal projects to fill up my time! But anyway, back to the mural.....

My beloved Yogawood in Collingswood, NJ (my first real yoga studio "home"), moved to a new studio last November, and I was hired to create something for the new space. I had previously painted a large mural in their Riverton studio in 2011, and I was thrilled to be asked to work for them again. It was a long process from start to finish, including major color color change early on when the studio's freshly painted walls were repainted a lighter color, and an incredible 58 man-hours spent doing the actual painting. I was very thankful to have a painting assistant during each of my 5 painting sessions, as compared to the 2011 mural, which I painted almost completely by myself.


The project started in mid November, when I met with Yogawood owner, Beth Filla, got a tour of the space & discussed what her goals were for the project. She wanted something very different from the last mural, inspired by henna designs. She initially wanted it to be graphic & non-representational, but I suggested it might be nice to have an Indian temple wall. Years ago, when I lived in Philadelphia, I took yoga classes at a studio near Rittenhouse square, named the Yoga Loft. The entryway was painted beautifully like a temple, complete with elephants & and jungle plants. It was really unique and made a strong impression on me. When I tried to look up the the Yoga Loft at the start of the project, I found out it had closed down shortly after I stopped attending classes in 2008 or 2009, so any inspiration from the mural would just have to live on in my memories.


After the meeting, I sat down at my drawing desk with many different photos of henna designs & temple art for guidance and started drawing many pages of quick, compositional sketches. I probably did about 30 - 40 of these, to try to get all my good ideas out. 


After going through the drawings & picking out my favorites, I used multiple sheets of tracing paper to enlarge, refine, & ink them before scanning into the computer.
Using photoshop, I added colors & manipulated my drawings over a photo of the wall, creating a true preview of the final design. Having a digital version was also helpful for the actual painting, as I used a projector to make sure everything was properly positioned

If you look close, you can see the shadow from the projector, as I trace over the guides for the light purple color. I had used a projector with the 2011 mural, with great results. Using it with this project was not quite so easy. I separated the painting process by color, and for the first color, it went great. Trying to line up the projector for the next colors was much harder, as there were so many tiny details to the design, & moving the projector a few centimeters in the wrong direction would throw off the whole design. While I was still thankful to have it, I'm going to change my approach for the next mural project to avoid wasting so much time with projector set up - perhaps just using it to get a pencil drawing up on the wall, not paint.


Day 2 of painting we made lots of progress - I even crazily thought I might get it completed in 1 more session! Hah! I was still 4 sessions away at this point.


By the time we got to the mandala in the center, I had given up on using the projector, and utilized the old string/thumbtack circle method I learned in grade school it worked really well!


The door was another challenge - I couldn't use the projector because the design was so intricate & the door was too dark to properly project on (even using black background with white lines). I ended up just painting it freehand over the course of many, many hours. I suffered from OCD symptoms trying to get it perfect. I'm sure there is a yoga lesson in there, there is no such thing as perfect!


When we started applying the brown paint, progress seemed to come fast........


............but there was still lots of little details to get hung up on.


At the beginning on the last painting session, finishing seemed like an unattainable goal. Breathe, exhale, repeat.

But- just before midnight on the final day, things came together.


I was a bit loopy when this shot was taken - this is me trying to feign excitement, when all I felt was fatigue, lol. Thanks to my sister, Ali Lopez, for taking it, as I was really to pack up & go with no photos.  I still have to get back there & take some nicer shots for my portfolio & new website. The new website that I've been (not) working on since July, ahh. 

But that's a story for another post....

Thursday, August 28, 2014

Emily Royer Show at Yell Gallery


I don't get out to as many gallery show openings as I'd like, so it was especially wonderful to catch up with my old classmate, Emily Royer, at her recent opening reception at Yell Gallery in Philadelphia.


Emily and I were both Illustration majors at UArts (and even worked at my first design job together!), though we have since went very different artistic paths, Emily venturing more into fine art, and I going towards graphic design.

Have to share: One of Emily's senior year Illustration pieces from UArts

I was always impressed by her painting ability in school, and I continue to be in awe of her work. She has a great painterly style.

Detail of one of Emily's paintings


I especially love how she captures subtle (and sometimes awkward;) expressions and feelings in her paintings. She had a few that were inspired by old family photos, not the ones you'd frame and hang in your living room, but the ones that were captured when no one was posing.

Awkward Family Photo : I love how the people are positioned, you get the impression there's a lot of tension in this room
She has been busy painting these last few years, and had a pretty substantial body of work. I'm looking forward to her next show, keep up the great work, Emily!

Emily Royer, not posing for my photo

Tuesday, October 11, 2011

Mural Painting


Last week I finished up another project for my beloved Yogawood - a mural on a 36 foot long wall in their Riverton studio. This was in the planning stages for quite some time, and I am so excited to see it finally finished and up on the wall. It was so relaxing to go in to the studio, put on a cd from their yoga-music collection, zone out and just paint (sometimes till 1AM, opps where did the time go??).

But I'm getting ahead of myself....let's go back to the beginning.......

Here was the wall before.

Before I started working, I had a meeting with the owner and studio coordinator, to hear their ideas about the project, what colors they wanted, what design style they were looking for, drink coffee, etc., etc. I took some photos of the studio and started doing research - they wanted native plants, so I went out to some fields and took some photos of plants for reference.


(hey! that's not a plant! Just making sure you're still paying attention..)

From these photos I started making some quick drawings in my sketchbook, then I use tracing paper and ink it before scanning it in the computer.


(yes, I'm a tree hugger, not one inch of my tracing paper shall go unused!)

I drew around 15-20 individual plants, picked some complementary colors, then put them all together to create a few different comps to choose from.


They chose #3, then I was off to the paint store to match colors and buy supplies.

I took a ton of wall measurements, then used my computer to create a grid to help me paint faster and with great accuracy.

(don't ever try to work with your computer on the floor, ouch, my neck was in terrible pain for days)

(can we just pause a moment to acknowledge the fantastic-ness of this grid? It took a lot of brain power for this non-math person to figure out)

I made a separate grid for each color of the mural, then used a projector (awesome!) to show me exactly where to paint.......


(hey guys! it's THE GRID in action! look! look!)

and paint......


 and paint.....


 and stop. 

to mix colors because I WAS NOT happy with the colors straight out of the can. of course.


then paint some more.....


so close!
.......
.......

(45 minute break for frenzied clean up of a can of paint I accidentally spilled all over the floor, and the wall and my only good pair of yoga pants. do you know how expensive good yoga pants are???)  
.......
(FYI - YES, I know painting is messy, i was only wearing the yoga pants because I went to a yoga class before painting, otherwise they remain in a locked case in my bedroom.)
.......
.......

DONE!


(and yes, the yoga pants survived. whew.)


You can view an album with more photos of the studio at my (yeah, just got with the program and created a facebook fan page, welcome to 2007!) HERE :)


Friday, June 11, 2010

TB Hagstoz Sign Update

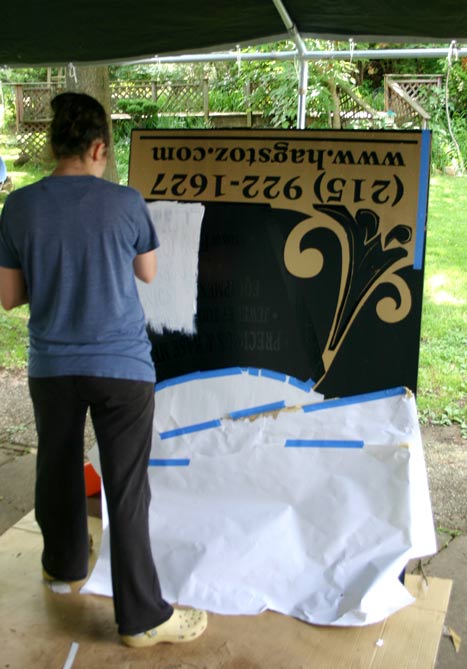
Three months ago, I shared with you a sign I had designed for the outside of the TB Hagstoz store on Jewelers Row in Philadelphia, PA. At the time, I had just finished the long, long process of finding a sign company to print the sign without going over the modest (as far as sign-making goes) budget. After meeting with owner of a particular sign shop, going over specs, choosing materials & uploading the design to their ftp site, I asked the owner if I could see a printed proof of the sign before they printed the full size one. This is when everything went downhill.... After acting confused as to why I might want to see how the colors would print before they made a huge 42 x 60 inch sign and bolted to the outside of a building, he said they didn't really print proofs, but okay fine, he would print it the next day and would call me to let me know when it was done....and that was the last I ever heard from him, ever. 

So on to Plan B.... Completely fed up with with the entire local sign industry, most of which I had to BEG to give me a price estimate, I decided, fine, if you don't want my business, I will paint the darn thing myself. And so, with the help of Loews, Sherwin Williams, Sheffield Bronze (who made the ONLY commercial grade gold metallic exterior paint I could find) & fabulous custom made vinyl stencils...i did. 

the end.

Friday, January 22, 2010

Lotus Painting


At exactly this time three years ago, my water broke and I was hurrying off to the hospital to have my sweet little Selena Lotus. I would say the time flew so fast, but it feels even longer than three years, because I have changed so much since then. 

In honor of my daughter's 3rd Birthday, I am sharing this painting I made for her room, completed a few days before she was born. I didn't go all crazy coming up with a "theme" or decorating her nursery (how un-artsy of me, I know), actually, this was the only thing on her wall. And while it isn't stereotypical baby room art, she loved staring at it when she was a newborn, the high contrasts made it a great infant-stimulation image :)


Acrylic on Canvas 16 x20 inches

Related Posts Plugin for WordPress, Blogger...